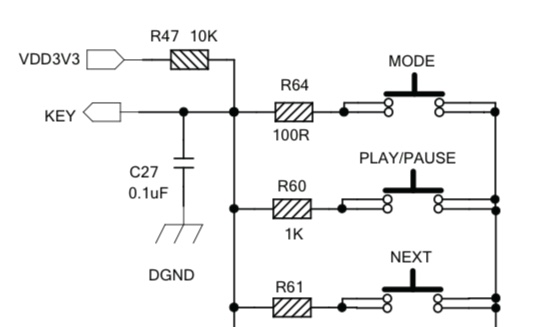
TLDR Upfront, how would I wire a stand alone mode switch?
So I picked up an Upstream2 pro v3 board to integrate into a vintage receiver. My hope is to integrate it within the receiver and have antenna, and Lan/usb/aux and SPDIF interfaces with the OEM in the rear. Leds will be located in some open real estate on the face plate and I have two obsolete features that I’m eliminating, which I think would be an ideal location for an external buttons for Reset and mode. I found in another thread about wiring an external reset switch needing to go to ground so that should be easy enough.
I haven’t found anything yet( I’ve done a quick look and will dive in more after work) about wiring up a mode switch. I don’t really need all the functions of the button board nor do I have the space all the buttons.
I’m going to be doing my due diligence this week but if anyone has a lead to a thread or the answer I would rather spend my time soldering a solution vs searching for an schematic.
Thank you for you time to read my thread.
Hi CZ,
The wiring for the mode switch is shown in the user manual, it consists of a couple of resistors (R47 and R64) a capacitor (C27) and a push button switch.
Sorry for hijacking an old post. As a new user, I’m not allowed to create new topics for a while and this is kind of relevant
Like the OP, I also want to add an up2stream Pro v4 to an old amplifier. I want to wire up an external push-button to cycle through the input modes. Is it possible to exclude the USB input from the cycle? I don’t want to add a USB socket to the amp enclosure and I don’t want to have an LED for an input that can’t be used.
Yes, you can wire an external momentary push-button for MODE just like the one on the button board. It’s simply extending the existing switch electrically, so the firmware still handles the input selection.
As for excluding USB from the input cycle, I don’t believe that’s configurable through the hardware. The mode sequence is defined by the LinkPlay firmware, not by the button itself.
A couple of alternatives you could consider:
Use the app or HTTP API to select inputs instead of relying solely on the Mode button.
Hide the USB input by not exposing a USB connector. The board will still cycle to USB, but if nothing is connected it will simply move on to the next source with another button press.
If you’re already using a microcontroller (ESP32, Arduino, etc.) in your build, you could skip the Mode button entirely and have dedicated “Line In,” “Wi-Fi,” “Bluetooth,” etc., buttons by sending the appropriate commands to the board. That also avoids cycling through unused inputs.
If your goal is a factory-looking installation with only the inputs you actually use, the microcontroller approach gives the cleanest user experience.
One question: are you planning to use the stock LinkPlay firmware, or are you comfortable controlling the board through its local API?
Thank you for the very detailed response, I really appreciate it.
I will be using the LinkPlay firmware. The microcontroller approach is probably beyond my skillset, which is a shame because, as you say, that’s the way to get a clean user experience.
I really don’t like having a ‘dead’ slot in the cycle so I guess I need add a USB socket to the enclosure and a corresponding LED to the display. It’s not the end of the world, just a shame when I know I won’t use it.
As a new user, I’m not allowed to create new topics for a while and this is kind of related.
I just received an Upstream Plate-Amp 2.1 and also plan to create a button board according to my requirements (Mute & LEDs). Looking at the wiring diagram for the Mode-LEDs the Cathodes should be wired to the respective pins and the anodes via resistors - to what? There is nothing specified in the diagram. Maybe the WPS-pin …
The diagram is right, and it matches the Arylic manual wording for the LED extension pins: they’re described as common-anode, so you wire 3.3V → current-limiting resistor → LED anode, and the LED cathode goes to its MODE/BT/WIFI pin on the connector. The board sinks current to light the LED (pin pulls low when that mode is active), it doesn’t source it. Steve1’s version would have the pin sourcing current, which these LinkPlay outputs aren’t set up for.
So the “to what?” answer for the anodes is the 3V3 pin on that same connector, through a resistor. Don’t tie them to WPS — that’s an input.
Resistor value: 3.3V supply, most indicator LEDs drop 1.8–2.2V and are plenty bright at 3–5mA, so 220–330Ω is a safe starting point. Go lower (150Ω) if you want them brighter, but I wouldn’t push past ~10mA per pin.
For the MUTE button, the diagram Steve1 posted earlier is the pattern: 3V3 → 10K to the KEY pin, 0.1µF from KEY to GND, and your momentary button in series with an 8.2K resistor from KEY to GND. That’s the MUTE position in the ladder. You don’t need the other buttons or resistors if you’re only using the one — the firmware just reads the voltage on KEY and 8.2K lands it in the MUTE slot.