Searching for: Volume control button that connects with Arylic Up2Stream

Hi fellow enthusiasts,

Very nice topic.

Just some input and my experience. Not to critize the wonderful work.
I couldn’t help wondering, if waking from deep sleep, what time does it take to wake up , connect and function for the this ESP?

I made a wifi remote with Arduino some time ago, but if I wanted to adjust the volume suddenly , the wake up time (approx. 5 seconds) annoyed me in the end. Maybe this is just me, I understand that.
I eventually went back to IR .
To my practial view it is crucial that wake up and function should almost be instant.

Best.

1 Like

This is definitely a very good point you make, and we can work on improving the user experience. I just did some measurements, and it is currently taking between 2.2 and 2.4 seconds for the device to become ‘ready’ on my network.

The benefit of WiFi over IR would be the ability to control a whole system vs individual devices, setup groups, and more things which are currently only available in the app. One of my examples also does some automation by chaining a few actions together at the press of a button.

Hi, I think 2 to 3 seconds is reasonable for volume control to me. In fact for waking and connecting the device this is fast. Fully agree on the flexibility from wifi control. Nice work on Github.:+1:

My solution for control was to let the always on ESP in my system take an IR command from my remote and translate it from simple to macrolike actions sent to my player. Bit of a middleman solution. Not perfect, but what is…

1 Like

So the firmware, as is, is being developed for a battery powered solution. However - with very minimal code changes, and I can even make it a configuration option, you can increase the 12 seconds timeout or have the device just never go to sleep. This would be if you are able to power the remote from an external source.

1 Like

The software that Matt has already written is open source, published on github and has a far wider scope of application that this Application/Topic.

Keep up the good work @mclarkdev

With the next version, you should be able to customize the action of each button :slight_smile:

1 Like

Concerning the wake from deep sleep, I think it would be great to have choices, like using it in:

  • Never sleep
  • Wake from sleep
  • From off to on

As some of you know, I have several grouped speakers based on Arylic, in a number of locations (customers & friends). So I keep them and their wishes in mind, when thinking about the volume knob.
Most of them will use the knob in ‘never sleep’ mode and rechatge it when necessary. Some of them in ‘wake from sleep’ mode.

I think I will already order the components of the BOM. I already have the ESP. So I can also start using a prototype, when that’s possible. And of course, start experimenting with the housing (3D design & 3D print).

@mclarkdev @NWT.Stuff
Question: Do you guys already have an idea what kind of battery will be needed?

1 Like

I think all 3 modes are actually the same thing in Software, with only a change to the timeout delay.

  • Wake from Sleep (timeout = 12s)
  • From off to on (timeout = 24h)
  • Never Sleep (timeout = 30d)

It is difficult to determine actual power consumption from the device because of the extra peripherals provided by the dev-kit. Starting with just a small 500mAh single cell battery, we should be able to get at least a starting point for approximate battery life. Once we build our first custom PCB we should have a much better idea of true power consumption.

1 Like

Hi Kevin, sorry I did not check the posts for a long time. The UUID on your screenshot has the reversed byte order. The 2nd service is the one to send remot codes. And the first one is used for linkplay to help setup wifi network.
I see the team have great progress with the prototype, great work.
For controlling the multiroom volume, there’s a httpapi if the NVS remote is connected to the master device. So it could send commands to control the volume of slave device. So the remote could check current master device volume, and calculate the new volume, and then send absolute volume to each device.

1 Like

@NWT.Stuff @KolfMAKER @Hydro3 @zpl1025

Oh do I have some exciting updates about the Arylic32 Firmware for our ESP32 remote!

I’ve been hard at work this past week and now have a feature packed little piece of software for our little device. Here is just a brief overview of the main two modes, there are probably a few small features I wrote that are missing from the description:

Setup Mode

After initial install of the firmware, no configuration is available, thus the device will boot into a ‘Setup Mode’. In setup mode, the device will begin to host a BLE server which you can connect to using any BLE explorer app, or a Provisioning app soon to come.

From the Explorer app, you will see the device is exposing a number of BLE ‘Services’ and ‘Characteristics’; reading and writing to these values will allow you to reconfigure the device and preform some basic actions.

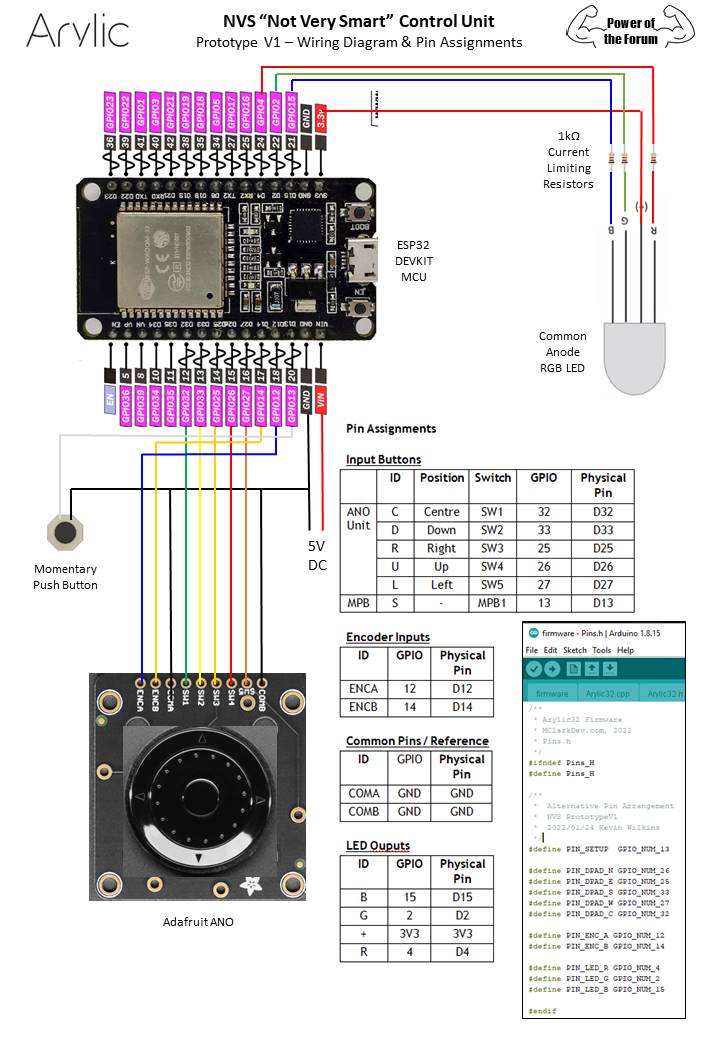
The current configuration allows a user to setup the connect to the WiFi network, customization of the action preformed by each of the buttons, and more. A full list of the Characteristic IDs and their names can be found in BLEProps.h.

After configuration is complete, setting one of the Characteristic values will trigger a device reboot into the normal operating mode.

To reconfigure the device, an additional input is used to toggle between run and setup modes.

Operating Mode

In a normal operating mode, the device is awake and connected to a WiFi network, ready at the click of a button to preform basic HTTP actions.

With a configurable timeout for power saving, the device will slowly count down the seconds until it can go to sleep. Simply pressing the center button will wake the device to connect and serve again.

An RGB led is also available for basic status indications, however these exact indications still need to be improved.


With this phase in software complete, we can begin to distribute a number of devices as Arduino studio and building the code is no longer required to configure the device once programmed.

1 Like

Nice work @mclarkdev :clap: :clap:

Thanks to your hard work we have a SETUP Mode much earlier than I ever imagined.

I will test the updates on Prototype V1 as soon as I can.

A very important step :slight_smile: :+1:

Very well done @mclarkdev :+1:t3: :sunny:
Incredible steps forward, and also faster than expected!

@NWT.Stuff Also very interested to hear about your prototype v1 test. :grinning:

1 Like

Prototype V1 updated to include SETUP mode button for testing.

1 Like

Wow you guys are making some amazing progress sorry I have been out of the loop. I will try to get caught up with everything and maybe do a prototype of my own so we have a few out there getting tested

1 Like

The more prototypes out there the merrier :slight_smile:

I intend to make a BOM tomorrow, a better quality Wiring Diagram is on the Open Project Server. I will post the BOM here and in the Open Project documentation.

1 Like

Very nice @NWT.Stuff , and looking professional Keving!

Great @NWT.Stuff Kevin.
I will order the components after you published the BOM.
:+1:t3:

1 Like

Sorry not happened today. However regarding Prototype V2

  • A Micro LED will look a lot nicer
  • @mclarkdev Matt has suggested an LED with the reset switch integrated in the centre.

I’ll prepare the BOM V1 plus notes - will be more like tomorrow afternoon now.

In fact I will prepare BOM with V1 & V2 columns so we can clarify as a Team what will be retained and what will be introduced in V2.

@KolfMAKER what were you thinking of as internal height of your enclosure, assuming width and depth are AKA old skool Apple TV ?

Agree!

Do you mean the centre button of the Adafruit Ano?

My thinking is somewhere between 2.5 and 3.5 cm. Because then the width+length dimensions will be in balance with the height. We have to check of course if all components will fit, especiallly for the battery (although I think they will). For the design, I am supported by someone with a master grade for Industrial Design.

No maybe I got it wrong but it is integrated in the LED.

@Hydro3 @mclarkdev @KolfMAKER @zpl1025

BOM for Prototype V1 Chez Moi :slight_smile:

The links don’t work in an Image file so here is a link to PDF format BOM PV1 PDF

By the way 20 x Clip on Terminals (with links) are the most expensive part of this Prototype Arrangement. However I would say when prototyping IMHO the main advantages are:-

  • A good electrical connection is ensured
  • Easy to make common terminals
  • Easy to substitute elements
  • Easy to make wiring modifications

My experience with Breadboards and Soldering led me straight back to clip on terminals for prototyping purposes :slight_smile:

1 Like